Walkthrough · Bring your own data
Bring your own data to AQUAVIEW
AQUAVIEW is one place for ocean data, but data has to get there first. Until now that meant a developer in the middle. Here is how providers add their own data instead, following the live demo step by step.
One place, once the data is there
AQUAVIEW's promise is one place for ocean data. You search it, see it on a map, query it and download it, whoever collected it and wherever it is kept.
That promise has a condition: to find data in AQUAVIEW, it first has to get there.
How data used to get in
Until now, every new source came in through a developer. One of us worked with the people who produced or hosted the data, wrote or adapted an ingester, indexed it and redeployed.
That was fine for the first sources. But the platform kept growing and ingestion didn't. Every new source waited in one queue, behind one person, and the developer in the middle became the bottleneck.
Bring your own data
Bring your own data takes the developer out of the middle. Data providers, and anyone else who wants their data in AQUAVIEW, add it themselves under Workspace → Data sources. From then on AQUAVIEW keeps it up to date.
There are five ways in:
| Route | You bring | The data stays |
|---|---|---|
| Upload | CSV, NetCDF or GeoTIFF files, from the browser | With AQUAVIEW |
| Command line | The same files, from a script, with aquaview push | With AQUAVIEW |
| Cloud bucket | A bucket on Amazon S3, Google Cloud Storage or an S3-compatible service, public or private | In your bucket |
| ERDDAP | One dataset, or a whole server | On your server |
| ArcGIS | A point layer | On your server |
Whichever route you take, the data is listed in the catalog and shown on the map, next to everything else in AQUAVIEW. Behind the five routes there is one pipeline:
Register → Check → Curate → Validate → Review (uploads) → Publish → Find → Keep current
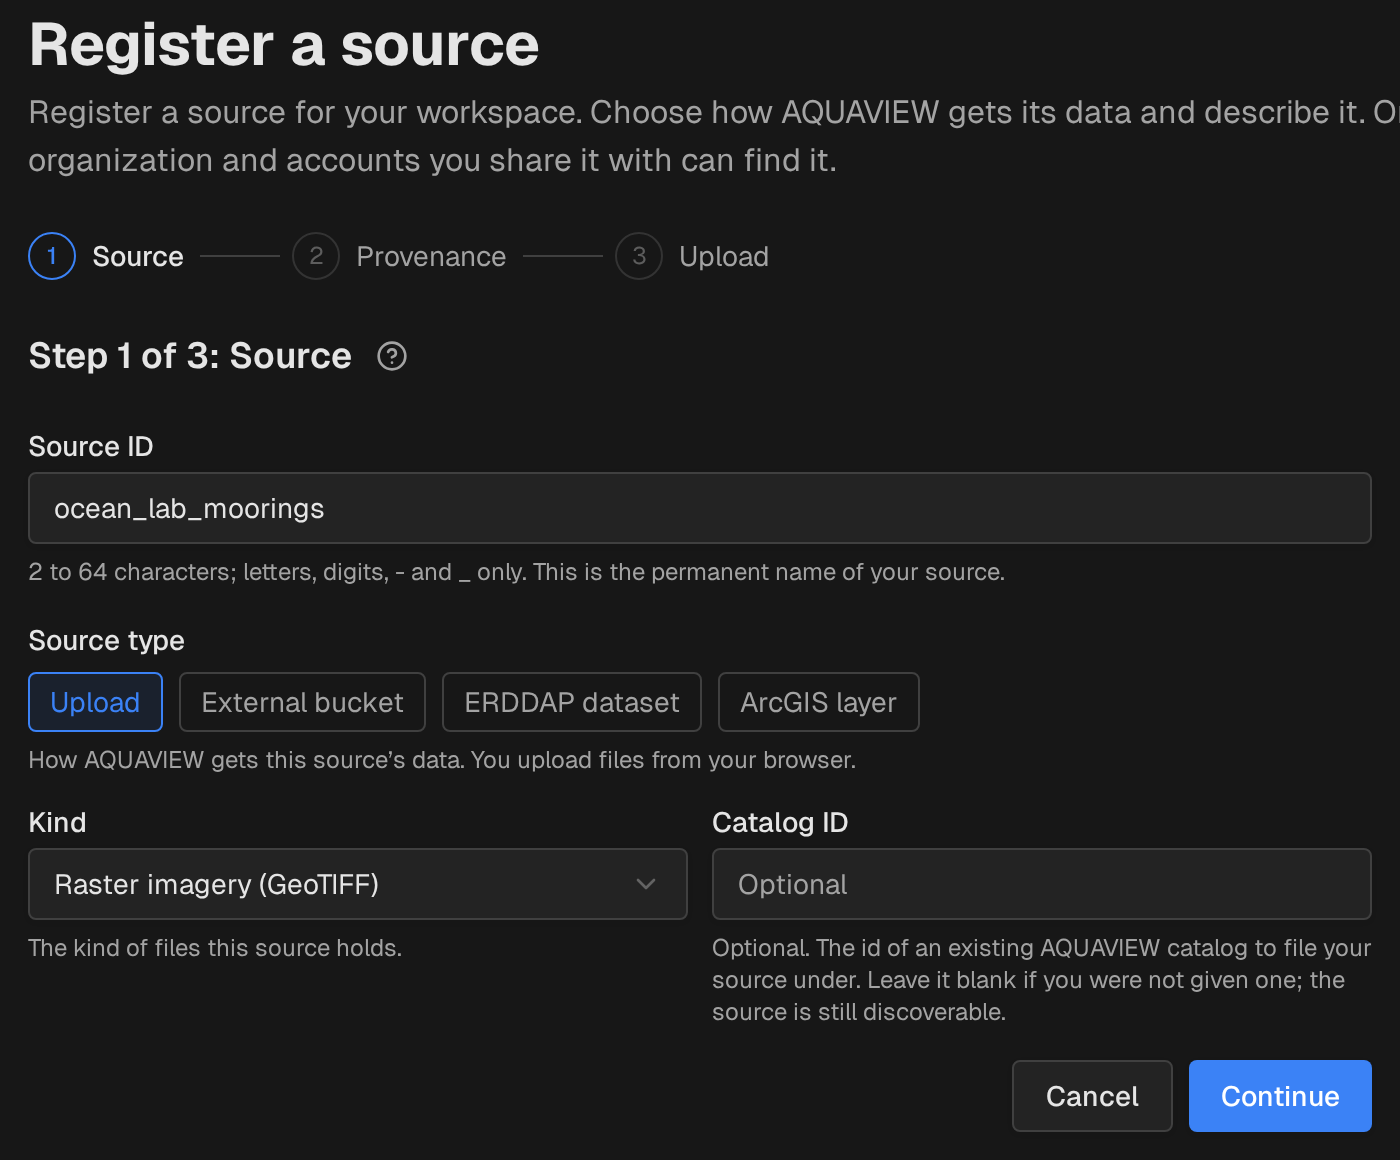
You stay in control. New data starts gated: only your organization and the accounts you share it with can find, query and download it, and our servers enforce that, not just the page. You can share a source with another organization and take it back. It becomes public only after AQUAVIEW reviews it. Your license and the names of who produced the data travel with every dataset.
Mistakes are recoverable. Nothing is published until the automatic checks pass. Every published version is kept, and you can roll back to an earlier one. When something fails, you get a plain message that says what to fix. A deleted source leaves the catalog at once and can be restored for 24 hours.
The walkthrough: a private bucket
In the demo we connected a private Google Cloud Storage bucket and turned one of its folders into a source. The bucket holds a small survey under gulf-of-maine/: two CTD casts as CSV in casts/ and two temperature grids as GeoTIFF in grids/. These are the exact steps, with the screens you will see.
Step 1: Add the bucket once
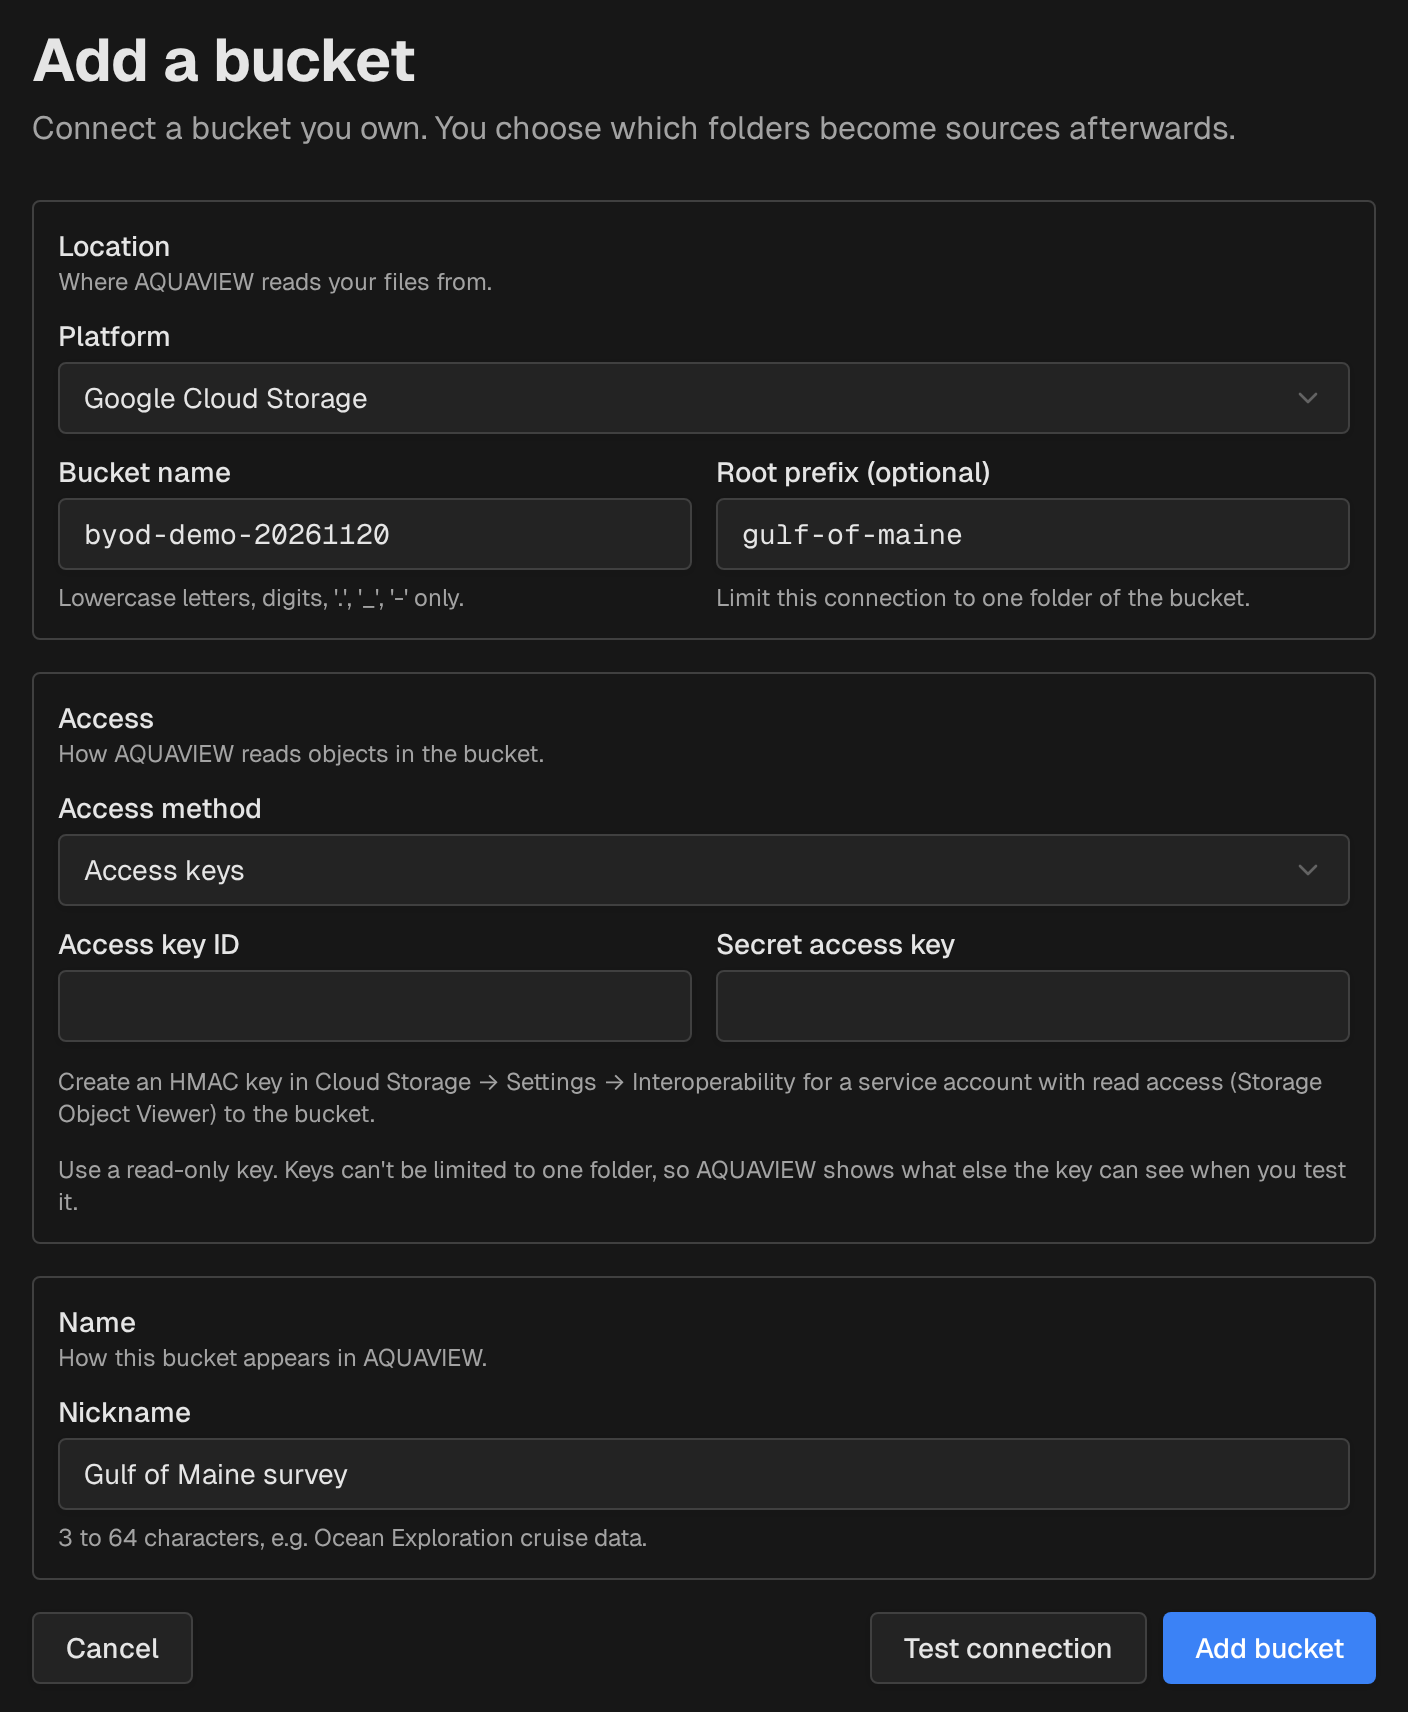
Go to Workspace → Buckets → Add bucket. Choose the platform (Google Cloud Storage, Amazon S3 or another S3-compatible service), type the bucket name and, if you like, a root prefix to limit the connection to one folder.
For a private bucket, choose Access keys. Use a read-only key. On Google Cloud Storage that is an HMAC key, created under Settings → Interoperability for a service account that has Storage Object Viewer on the bucket.
Step 2: Test, then save
Click Test connection. AQUAVIEW lists and reads a few objects with the key, and tells you whether the key can see any other buckets, so you can swap it for one limited to this bucket. Nothing is saved until the test passes.
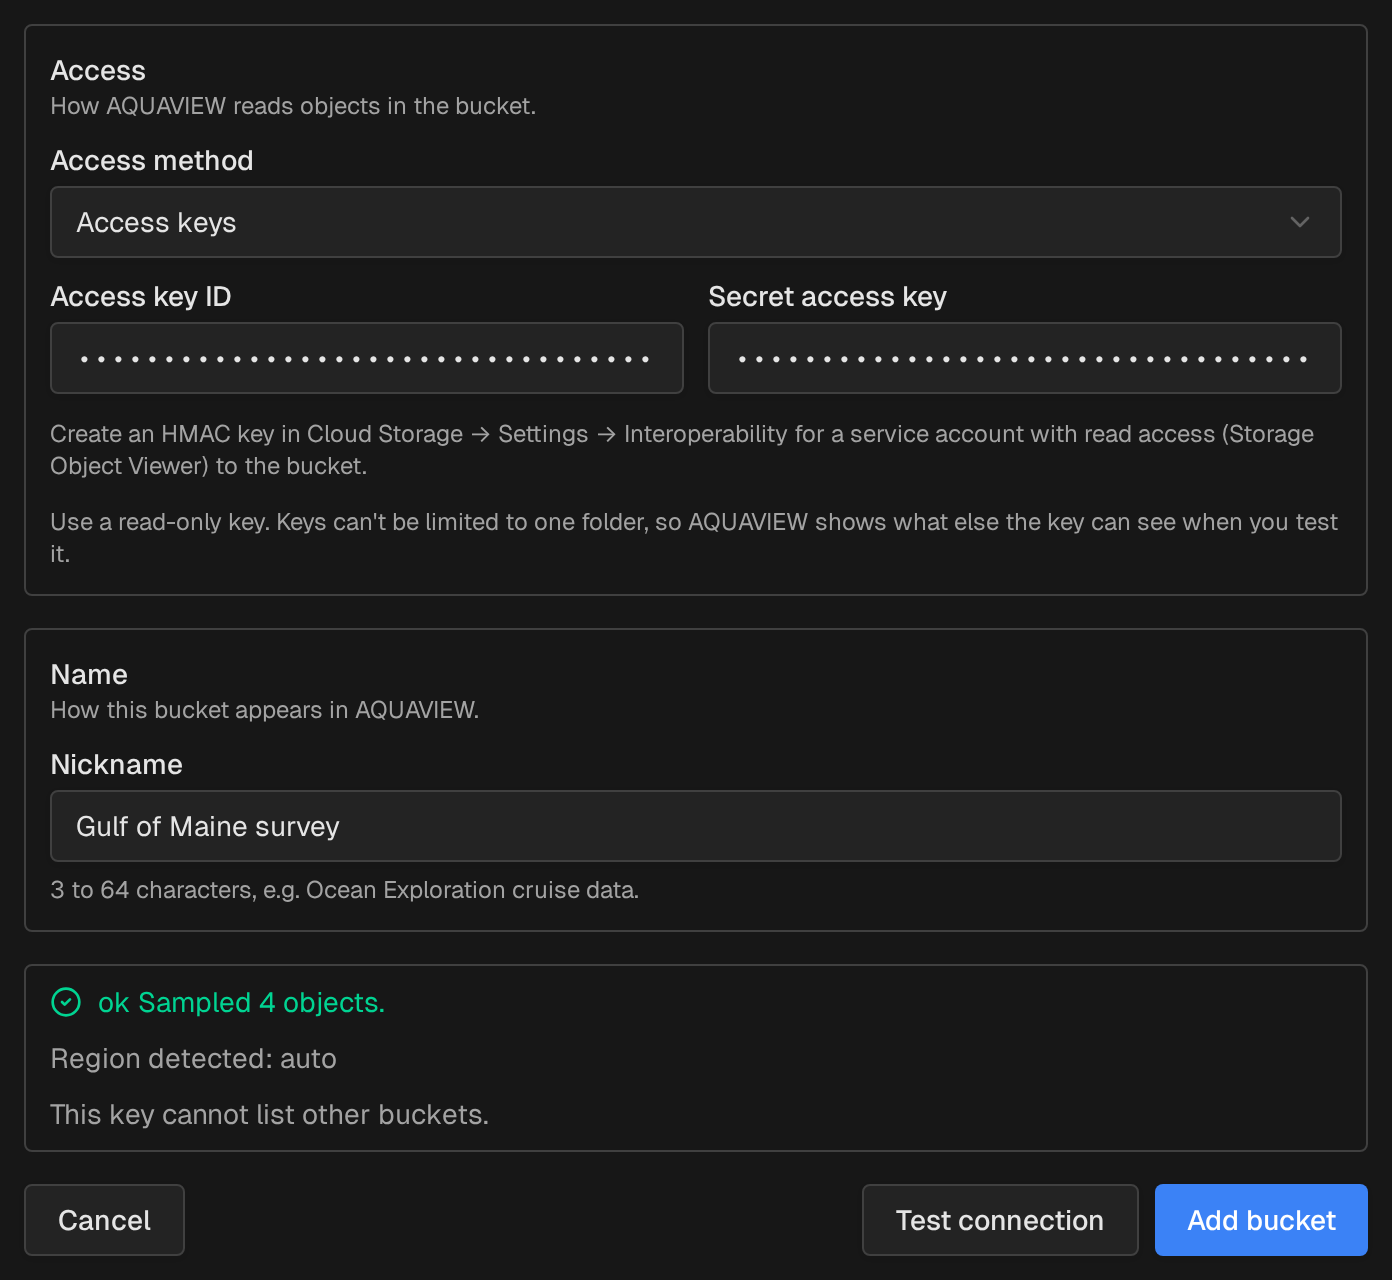
Click Add bucket. The bucket now has a card on the Buckets page.
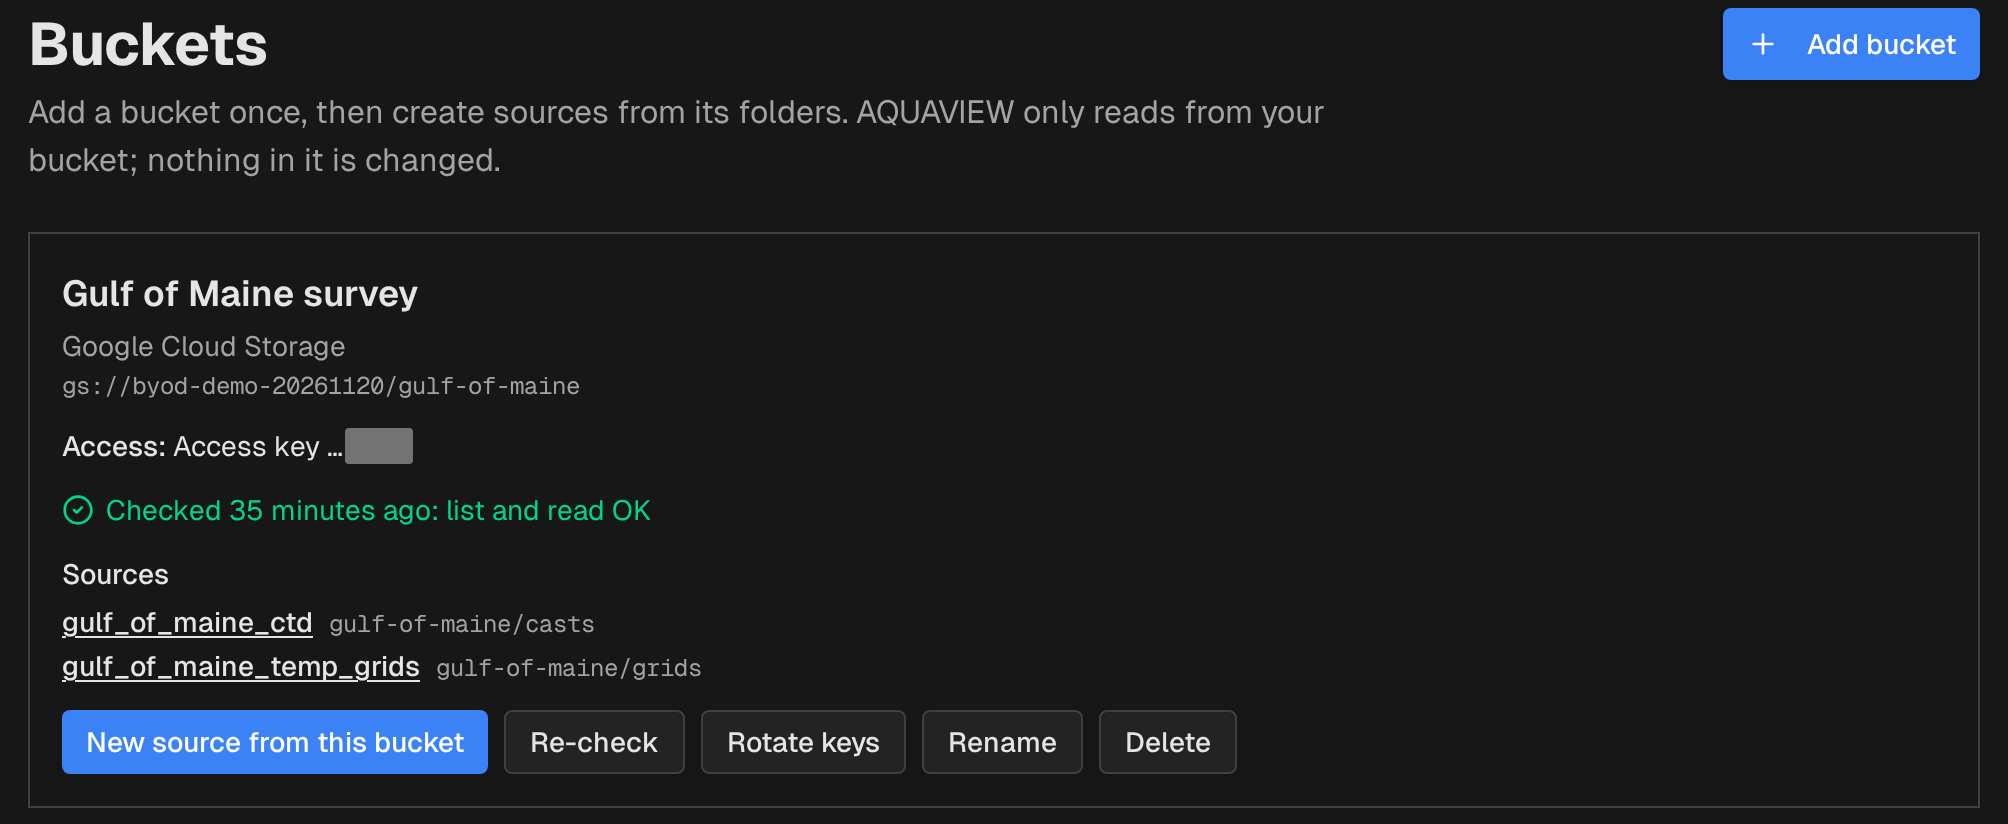
How we look after the key:
- A key that can't list and read the bucket is never stored.
- Each bucket gets its own secret in Google Secret Manager. Keys are never kept in our database.
- Only the last four characters of the key ID are ever shown. The secret is never shown again.
- Rotating keys tests the new key first, then destroys the old one.
- Deleting the bucket deletes its keys.
- Every key change is recorded in an audit log, without the key.
Step 3: Pick a folder and preview it
Click New source from this bucket and browse one folder level at a time. We opened casts and clicked Use this folder.
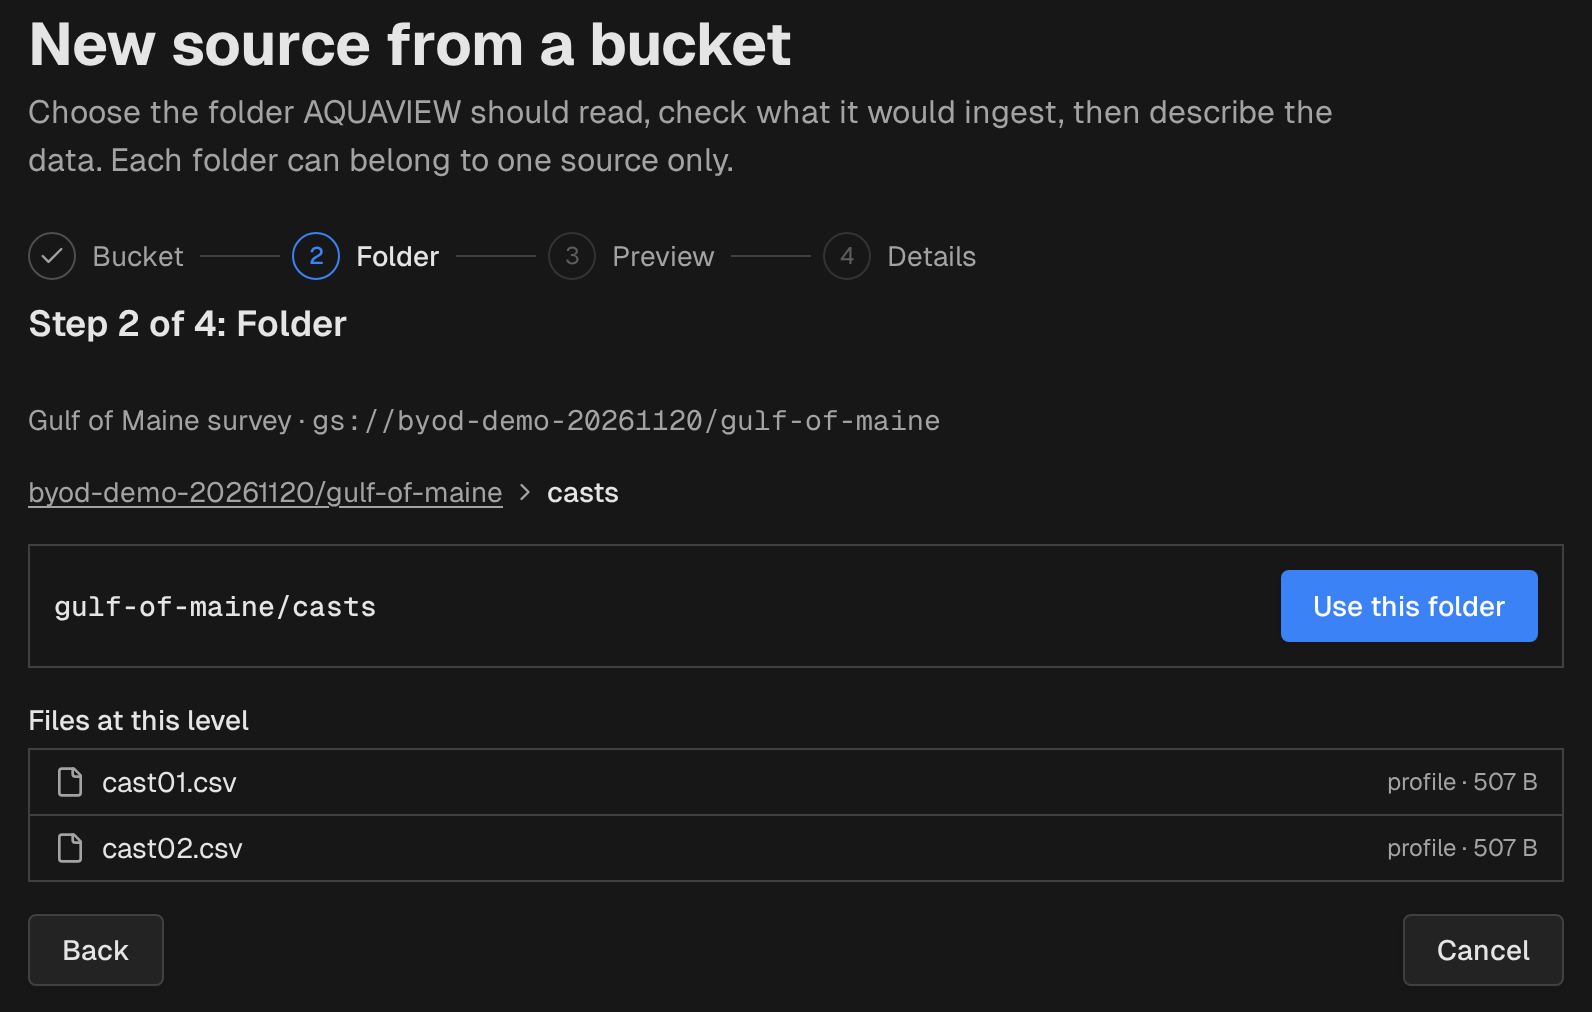
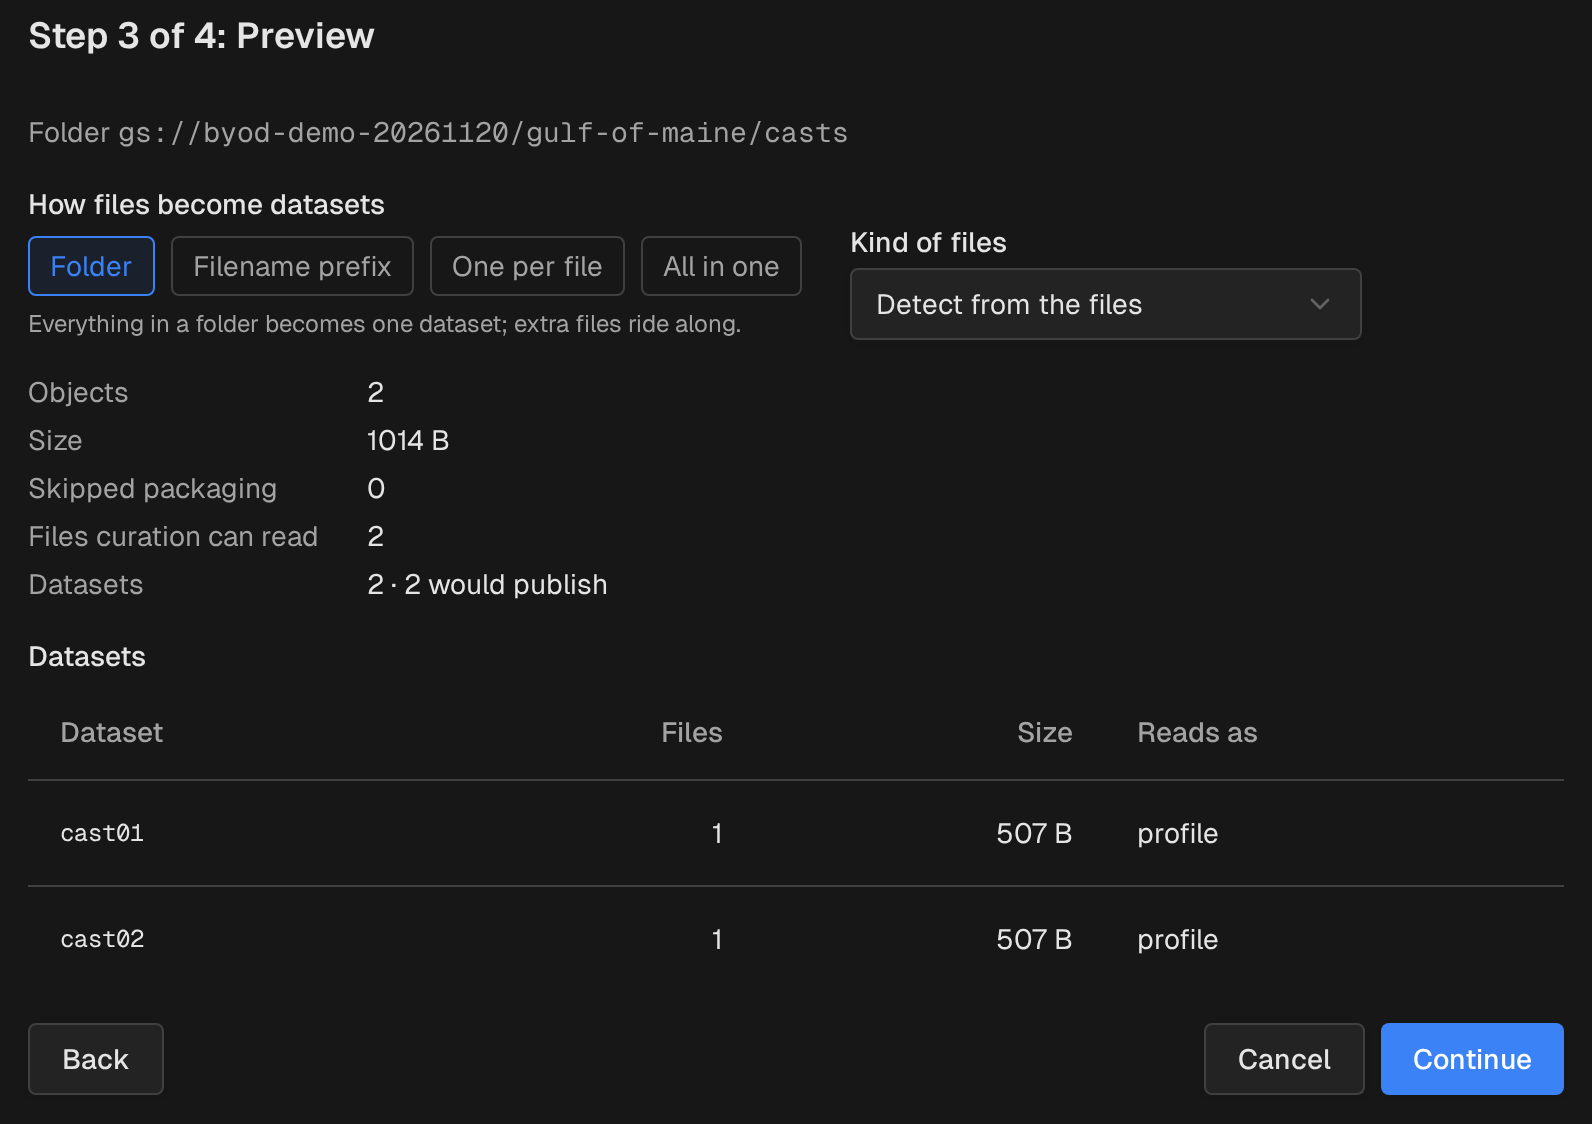
Nothing is registered yet. The preview shows what AQUAVIEW would build from the folder: how many files it can read, which ones it skips, and the datasets they become. Here, two casts become two datasets.
Step 4: Describe it and register it
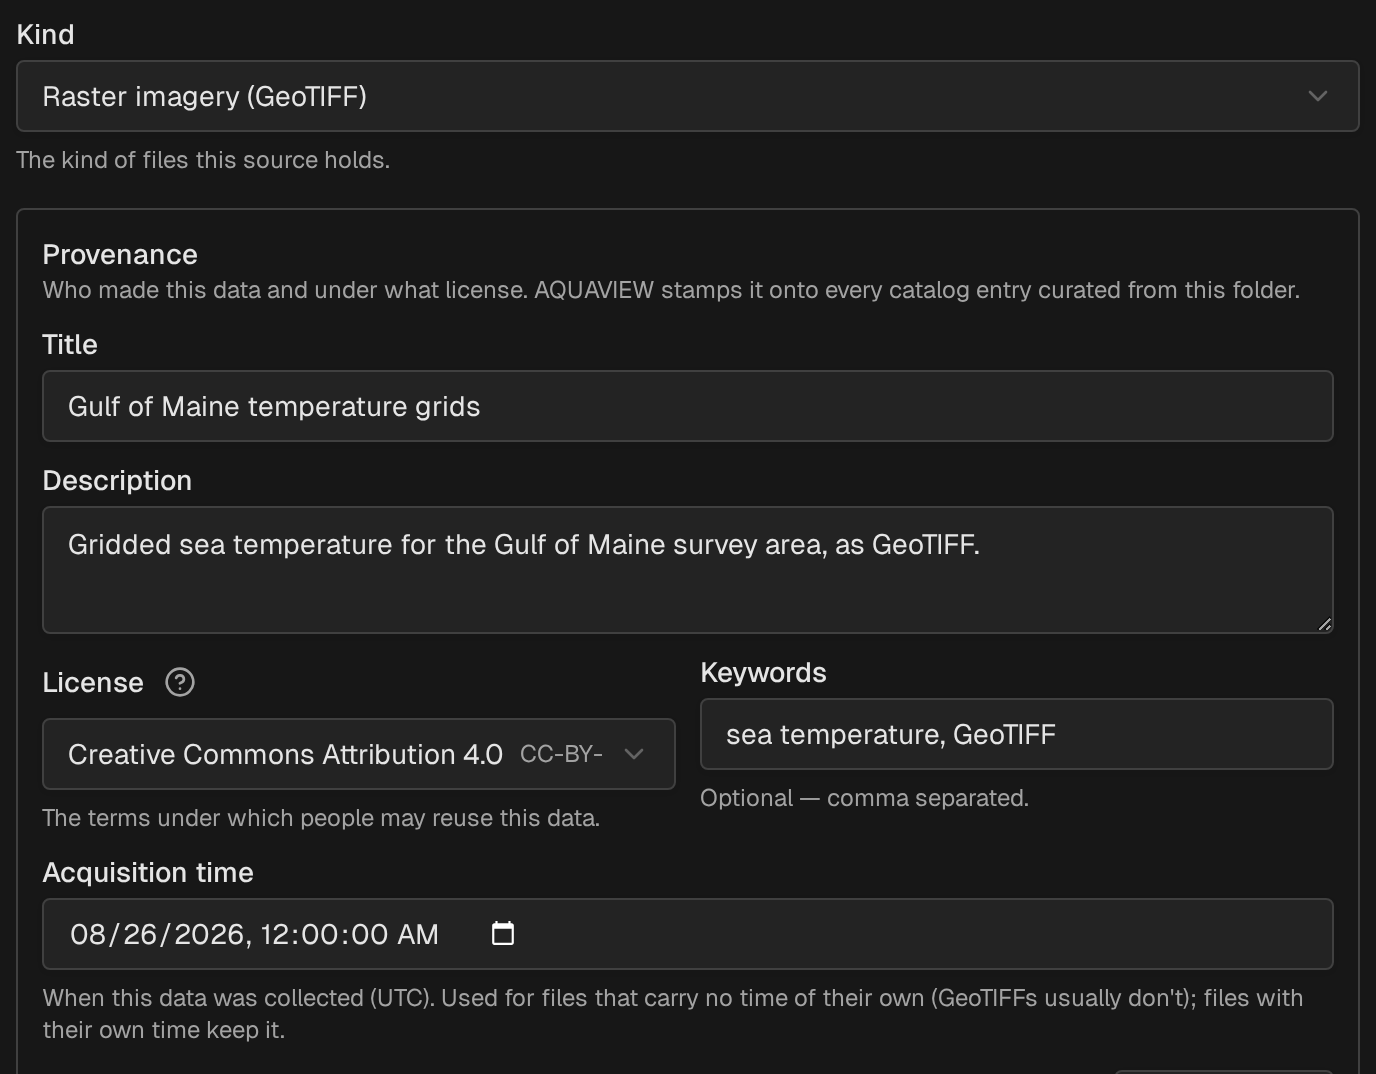
Give the source a permanent Source ID, a title, a description and a license, and name the organization behind the data: who produced it and who licenses it. AQUAVIEW stamps these on every dataset it builds from the folder.
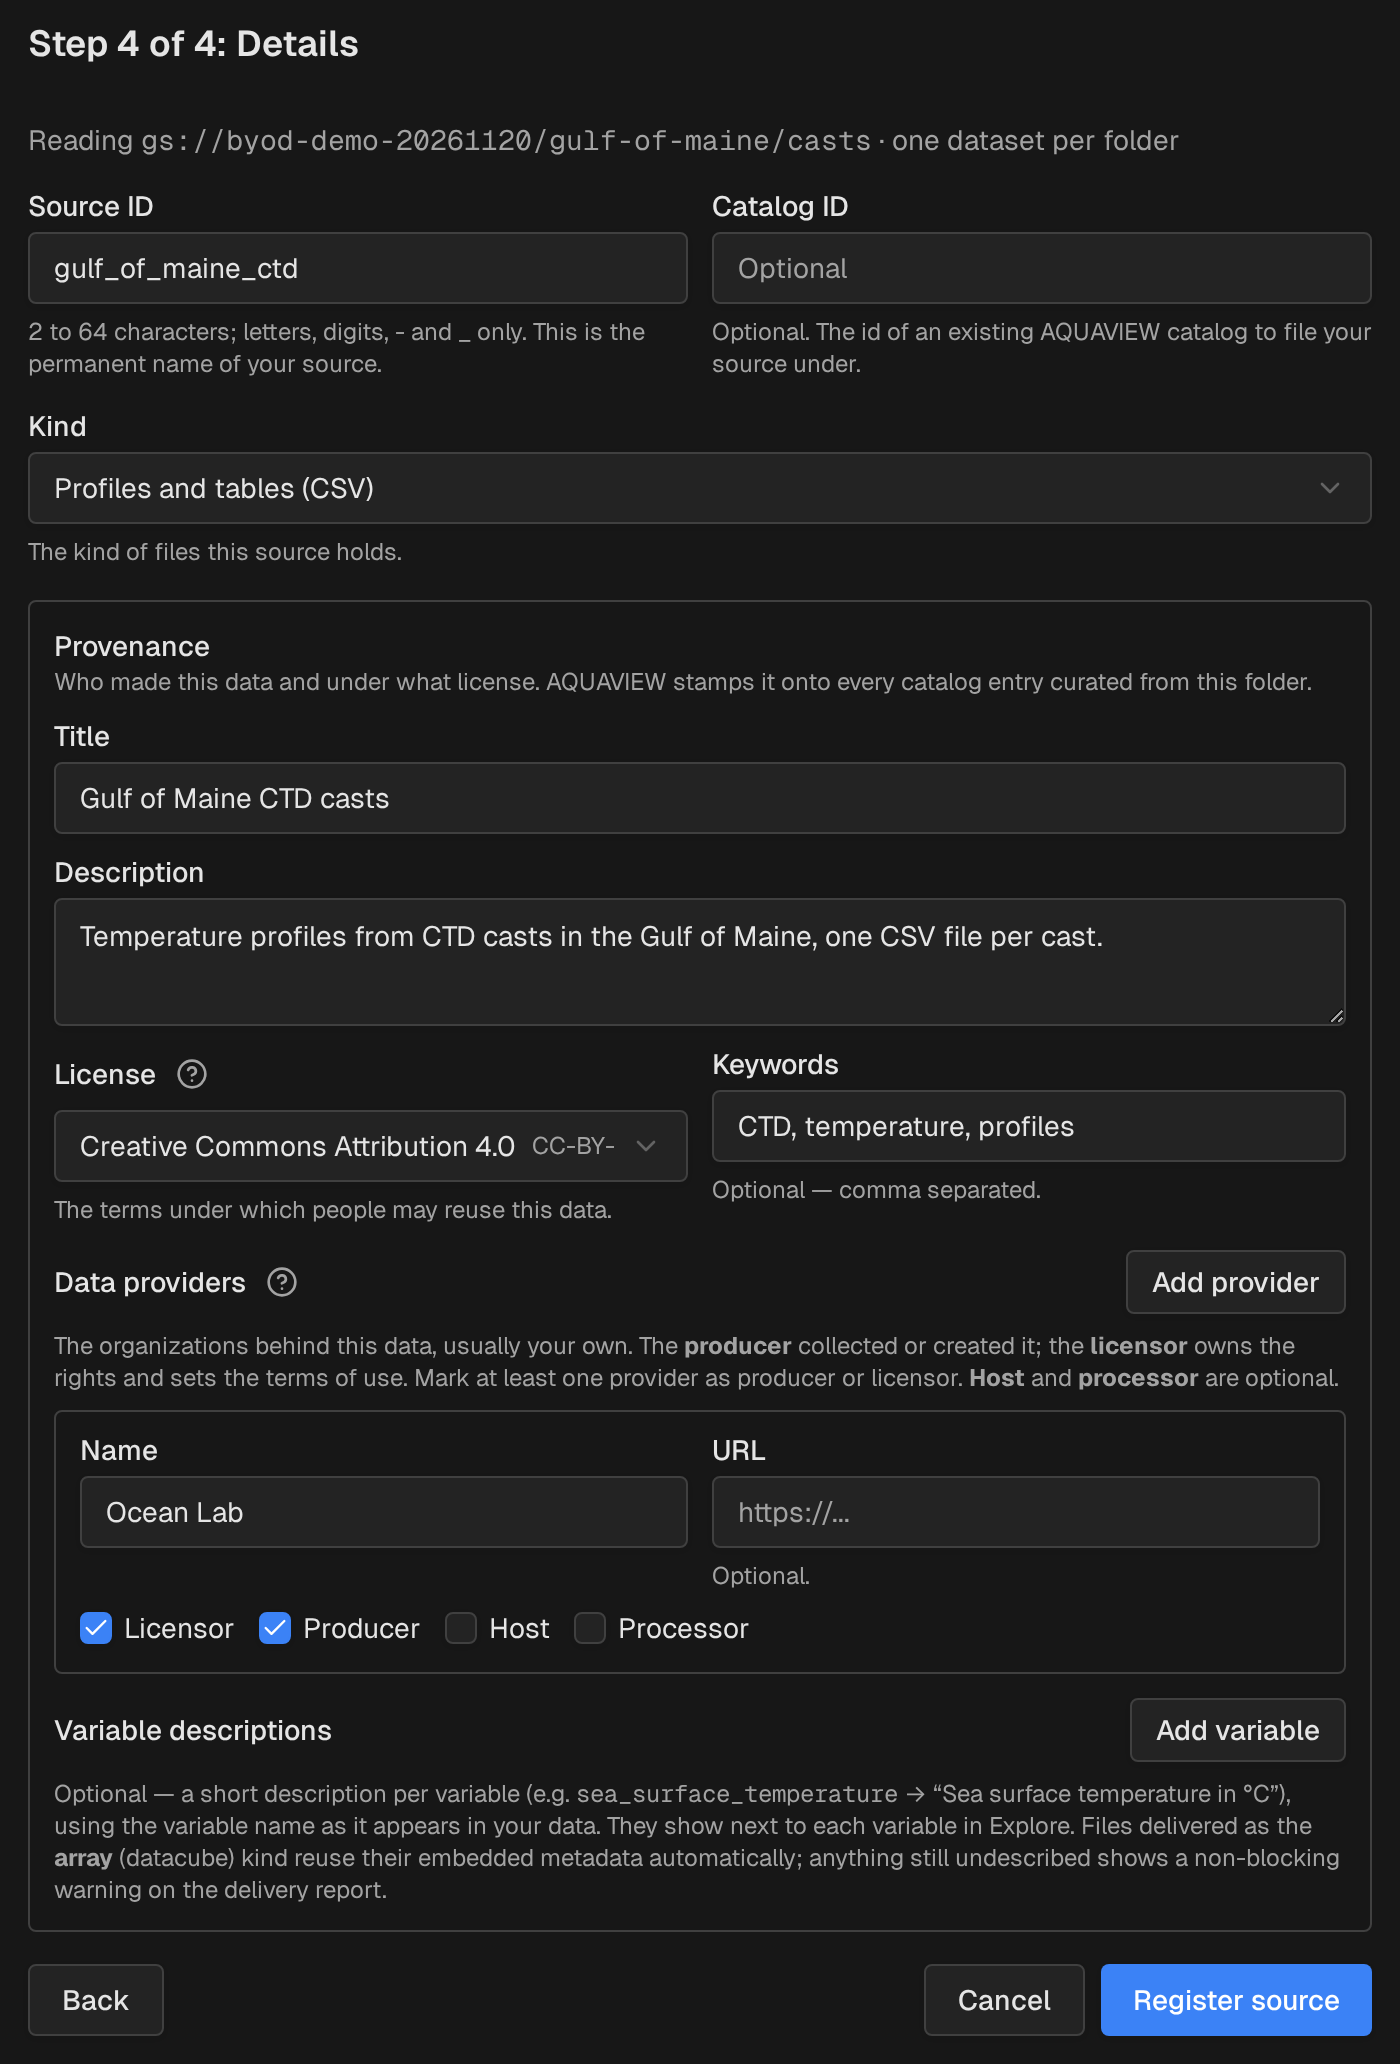
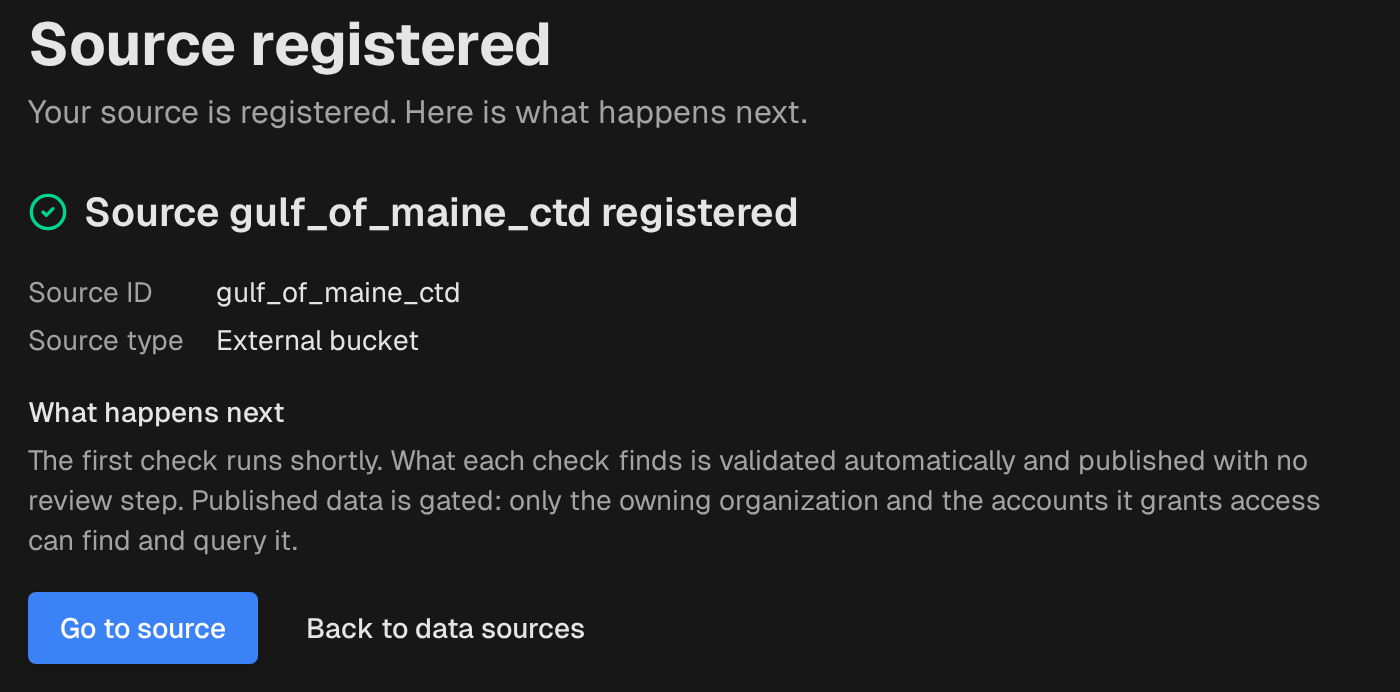
Click Register source. Bucket sources are checked automatically and have no review step. They start gated, like every source.
A GeoTIFF has no time of its own, so for the grids folder we also set an Acquisition time. AQUAVIEW never invents one: without it, a GeoTIFF dataset isn't published. NetCDF files that carry their own time keep it.
Step 5: AQUAVIEW curates it where it lives
Within a few minutes, AQUAVIEW reads the files in place with the stored key, builds a catalog entry for each dataset with its place, time and variables, and checks each one before publishing it. The files are not copied out of your bucket.
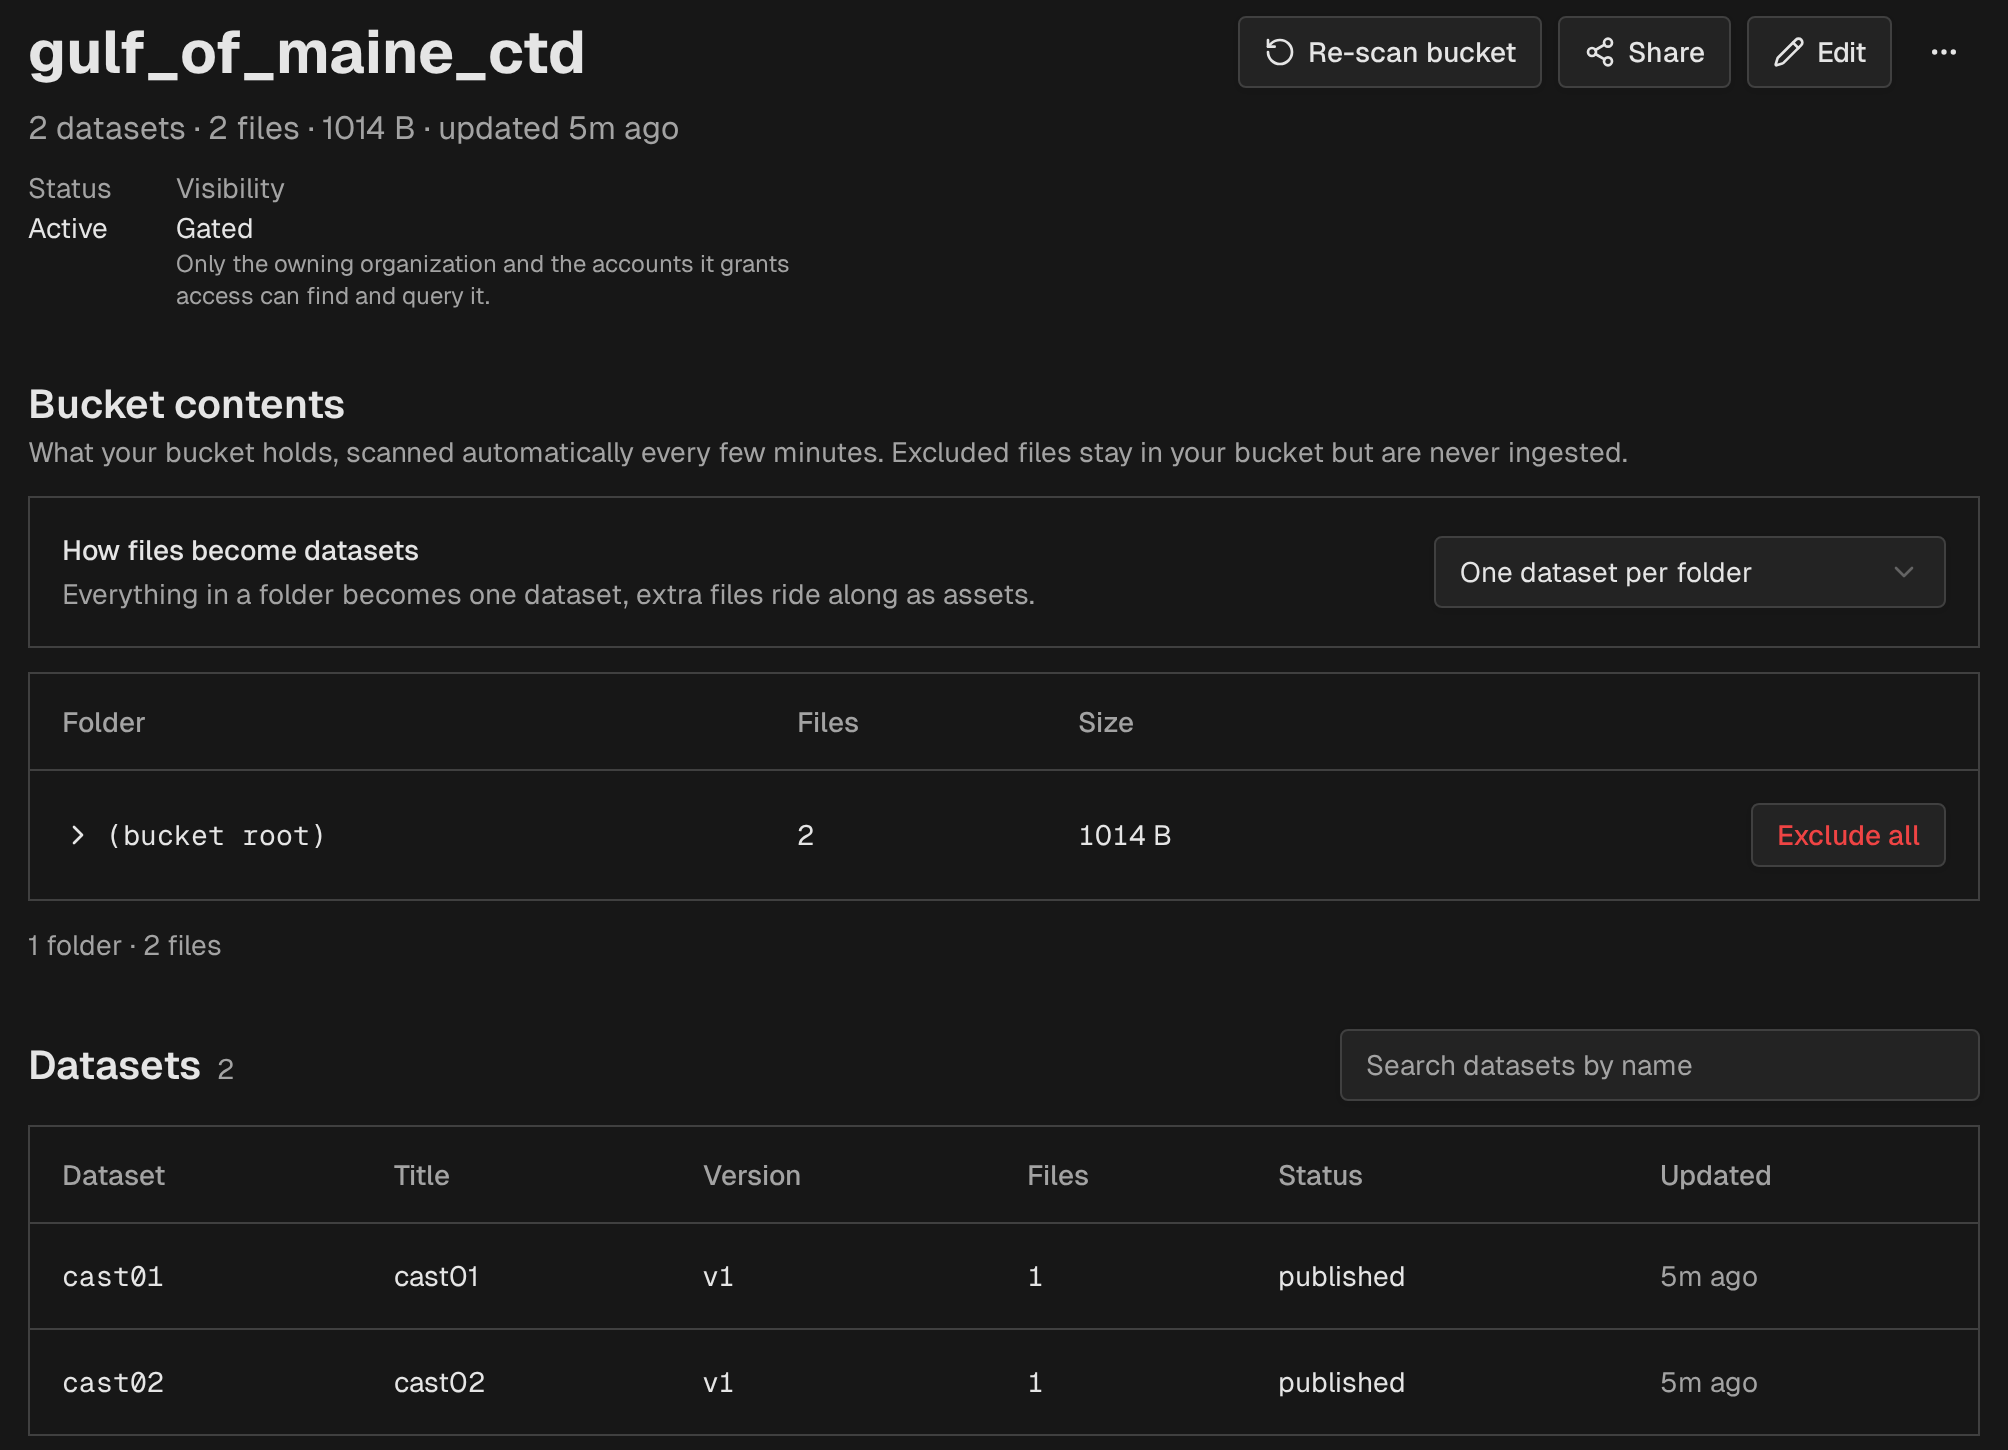
From then on AQUAVIEW scans the folder every few minutes. Files that haven't changed aren't read again, so adding a file to a big folder is cheap.
Step 6: Find it and download it
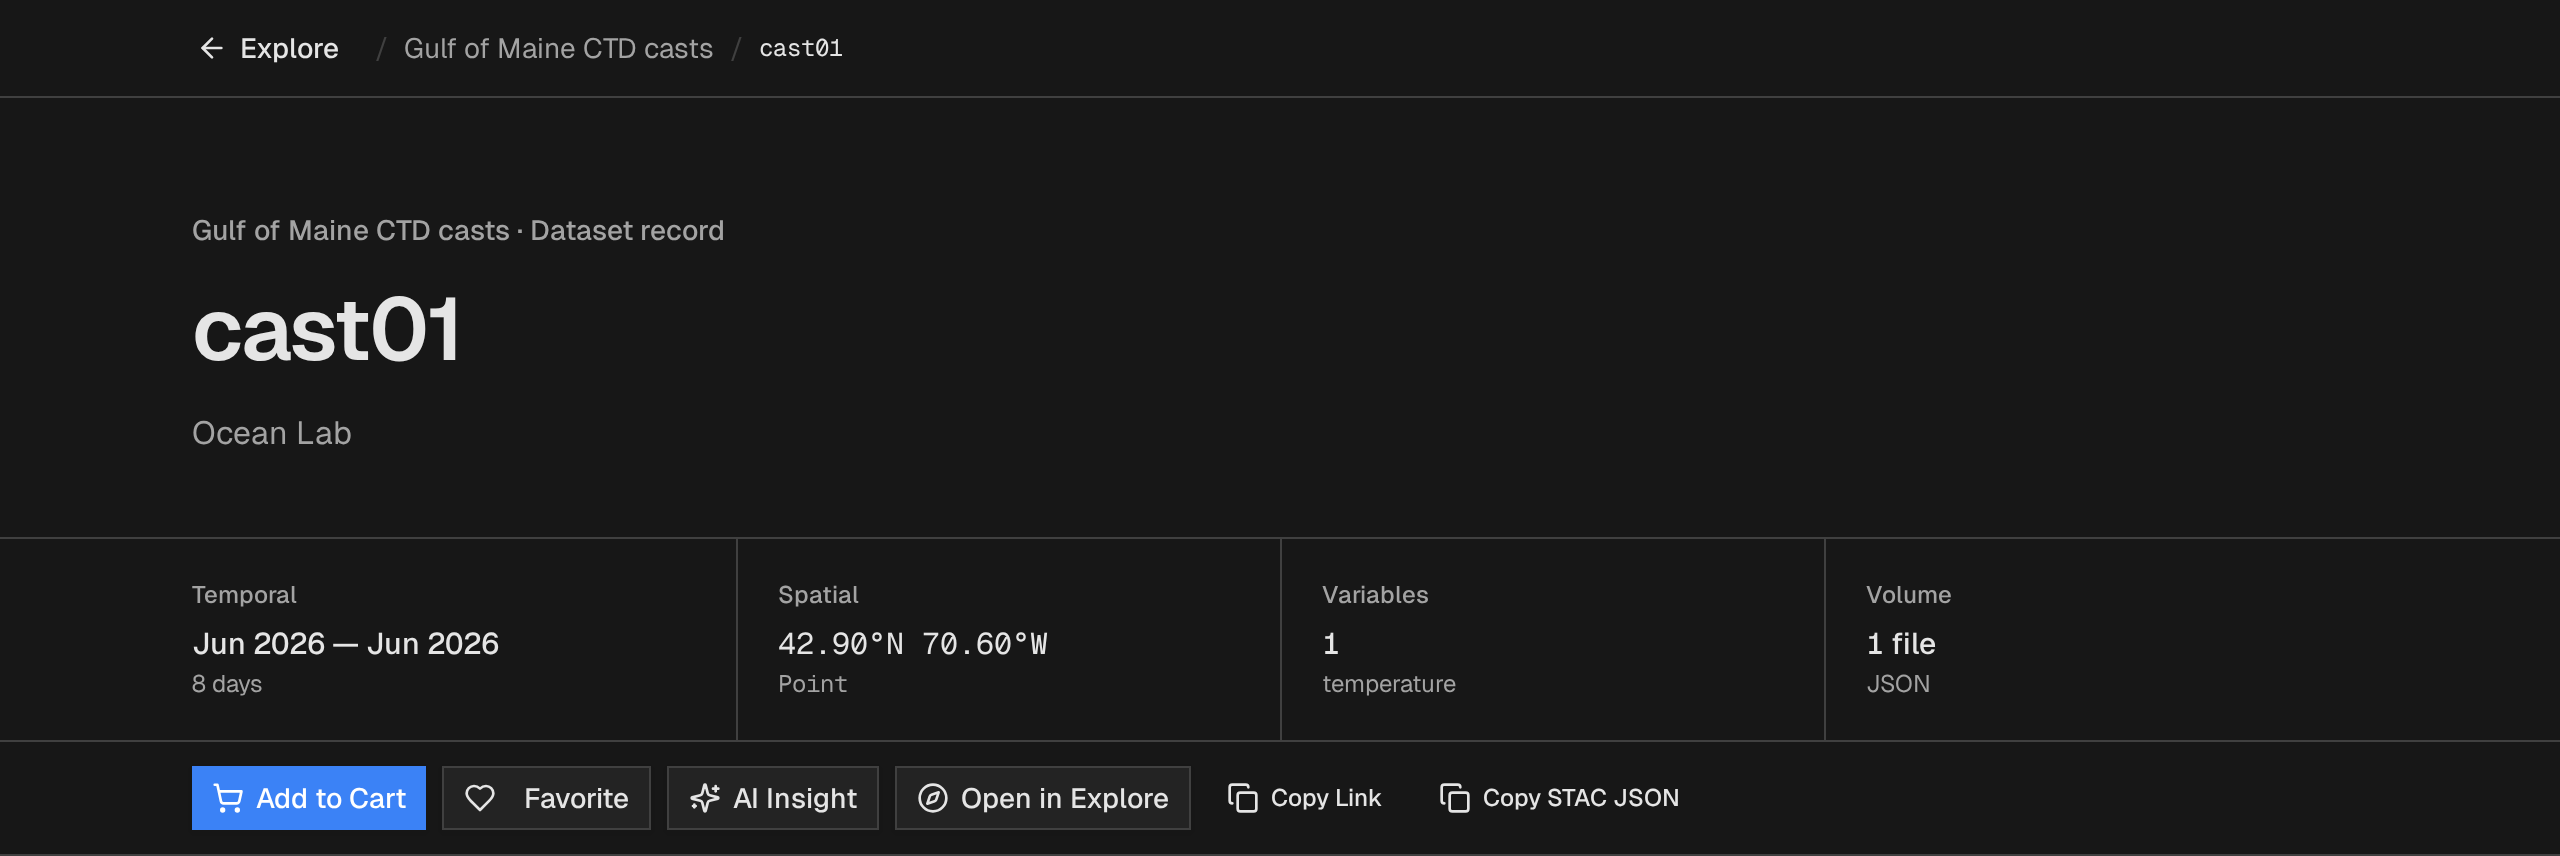
Once AQUAVIEW switches the new source live, its datasets show up in Explore for the people allowed to see them, with the title, license and producer you entered.
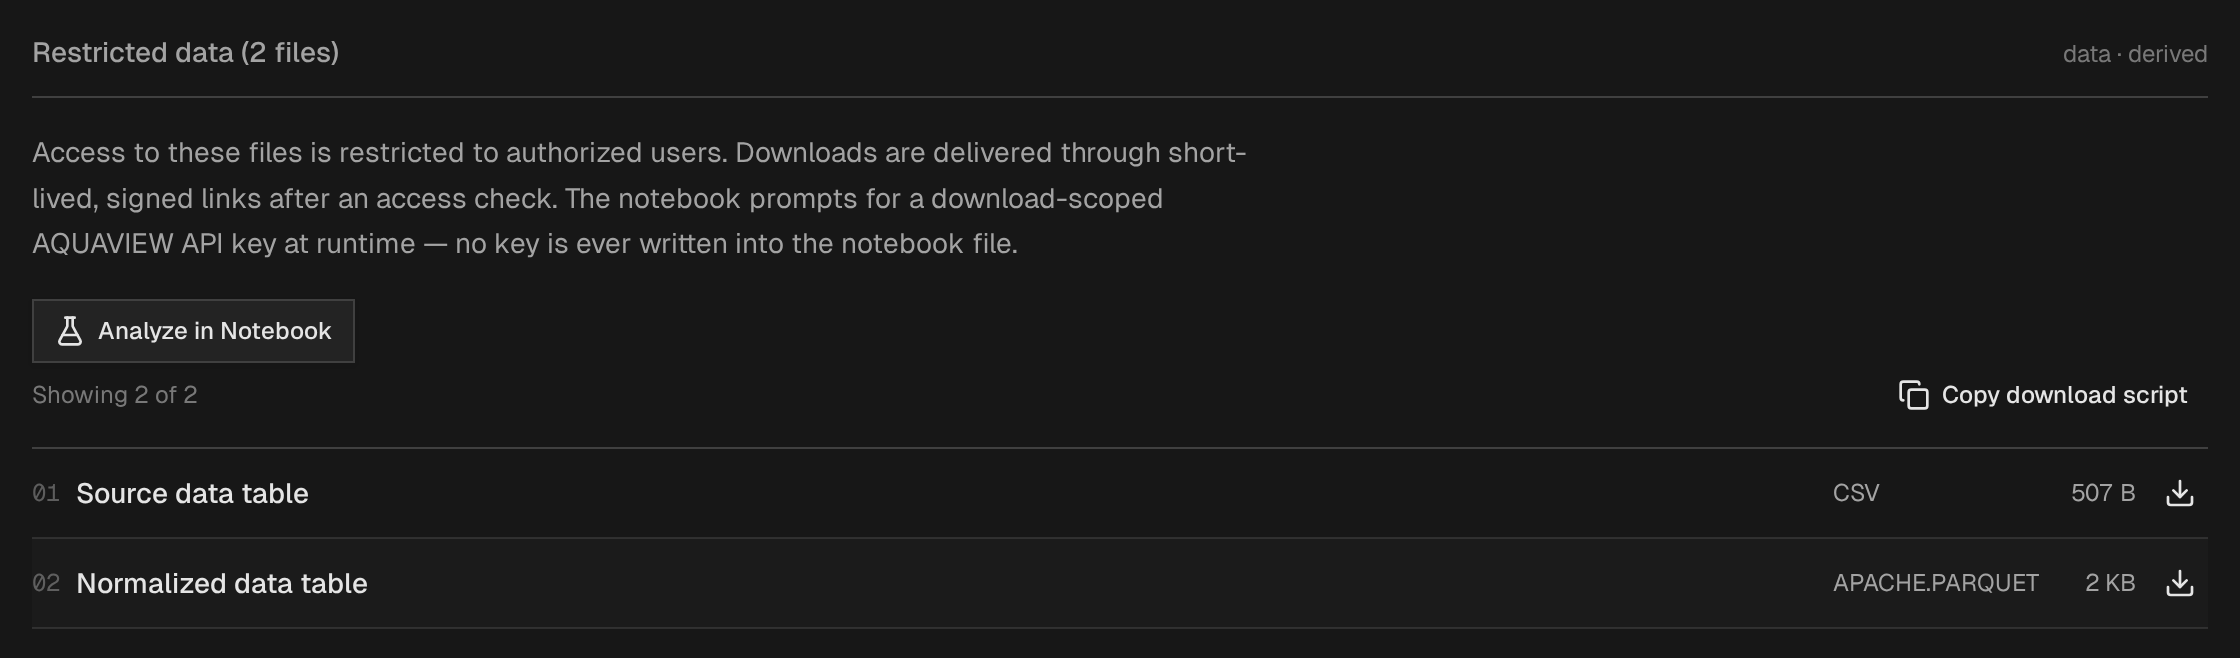
A download goes through AQUAVIEW's access check first. Then the file comes straight from your bucket: for a private bucket, on a signed link that expires after 15 minutes; for a public one, on its plain URL. AQUAVIEW also keeps the table it normalized while curating, so there is a second, ready-to-use copy.
Every route ends in the same list
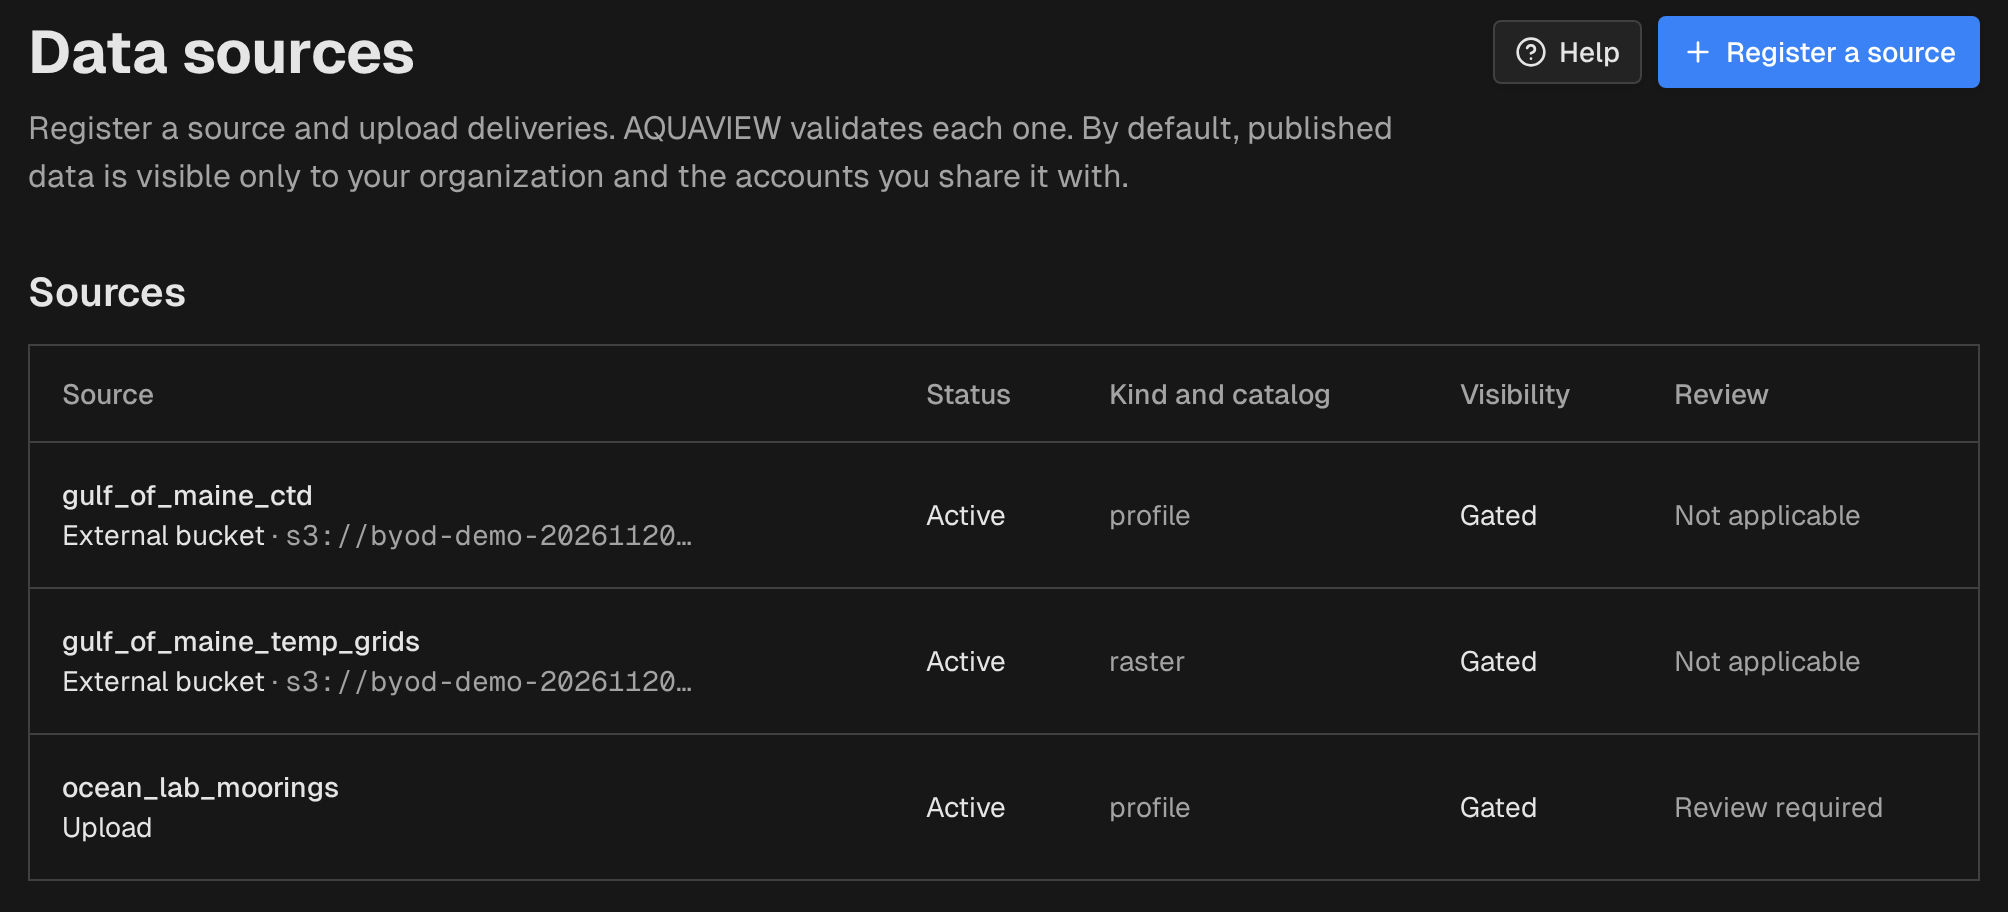
Back on Data sources, the two bucket folders sit next to an upload source in the same list, each with its status, kind, who can see it and whether it needs review.
Try it yourself
You need an AQUAVIEW account with the admin or owner role in its workspace, and some data. For a bucket:
1If the bucket is private, create a read-only key for it. The bucket guide has the steps for Amazon S3, Google Cloud Storage and other services.
2Open Workspace → Buckets → Add bucket, fill in the bucket, and click Test connection. Fix anything it reports, then click Add bucket.
3Click New source from this bucket, browse to a folder and read the preview.
4Fill in the details, adding an acquisition time for GeoTIFFs, and click Register source.
5Open the source page and watch the datasets appear after the first check.
For uploads, the command line, ERDDAP and ArcGIS, start at Workspace → Data sources → Register a source. The Bring your own data guide has a page for each route and an entry for every message you might see.
The honest part
Here is what it doesn't do yet.
Can people query my rows, not just download files?+
Only for CSV tables you upload. Those can be asked for an area, dates, depths or some variables, and only the matching rows come back. Files in a bucket, ERDDAP and ArcGIS sources are listed, mapped and downloadable, but not queryable row by row.
Can my ERDDAP server or ArcGIS layer be private?+
Not yet. Both have to be public. AQUAVIEW links to them rather than copying the data, and your server keeps its own access rules.
Will photos show up next to my records?+
Only from an ArcGIS layer with an image URL field. Images you upload or keep in a bucket are stored and downloadable, but not shown as pictures.
Are there map tiles for imagery in my bucket?+
Not yet. GeoTIFFs that stay in your bucket are catalogued and downloadable, but AQUAVIEW doesn't draw them on the map.
Who pays when someone downloads from my bucket?+
You do. The file comes from your bucket, so your cloud provider bills you for the transfer. A link to a private bucket also contains your access key ID (never the secret), so anyone who receives a link can see which key signed it.
Questions, or data you'd like to see in AQUAVIEW? Reach out through aquaview.org.